A little bit of Monica in my Life

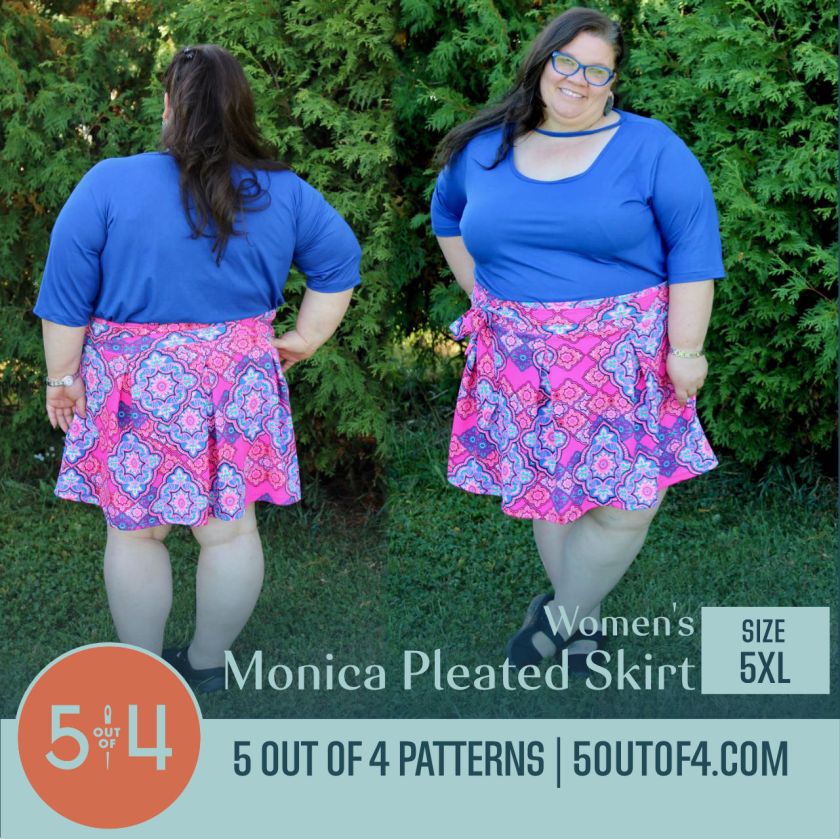
Next up, I am sharing Monica! This is my third skirt from the collection and perhaps it is my favorite! I love the pleated detailing on Monica. It gives a wonderful fullness to the skirt without added bulk and shockingly, I find pleating way easier than gathering. Plus with pleats, everything is even because the marking is included in the pattern. No fussing with adjusting gathers. Monica, like all of the other skirts in this collection, features a high rise waist and sews up fairly quickly and easily. All of the options in this collection are interchangeable. That includes pockets, waist bands, and suspenders.
5oo4 Monica 5x (4)
I chose the mini length of Monica. I height adjusted 2 inches for my 5’1 frame and my skirt hits just at the top of my knee. I already have plans to make this as a maxi length. It is so pretty and very comfortable! I added the waist ties and made a bow at my hip. I also added in seam pockets because I don’t understand why people don’t want pockets in their clothing. 🙂
5oo4 Monica 5x (6)
Here are all the options for Monica!
  • Three Hem Lengths: Mini, Knee and Maxi
  • Options include Waist ties and Side Seam Pockets
  • Four Waistbands: Basic, Tall, Encased Elastic and Contour
  • Tutorial includes a link to an extensive Skirt Fitting Guide to get your best fit!
  • Women’s Sizes XXS-5XL (see the last image for yardage and size chart)
5oo4 Monica 5x (3)
This skirt pattern requires a stable knit so of course I had to use some of my precious Liverpool. I chose this vibrant hot pink background print for my skirt! I love the brightness of the colors. Even though it is fall here, I still need bright colors! This beautiful Liverpool is from Zinck’s in Berlin. I picked it up early in the summer and I have been hoarding it for awhile. I thought I would make a blazer with it,  but it makes a perfect skirt! Don’t worry, I still have plenty left for a cropped jacket!
5oo4 Monica 5x (5)
Remember this top from Monday’s post when I said I would be sharing it later in the week? Yeap, another Easy Tee with a slight hack. Only a slight adjustment was made here. I cut the pattern at the scoop neckline and only added a band to the “scooped out” part in front. I then cut the neckband length for the crew neck shirt option and attached it like binding instead of bands. This allowed me to tuck the raw edges inside and then top stitch them in place. Now that I know how this fits, I would change a few things. 1. Start the bonus neckband a little lower so it isn’t right against my throat. 2. Maybe add some sort of stabilizer in the band to keep it from being sooo stretchy. and 3. Do better about top stitching. This beautiful Royal Blue Fabric is from Stitchin’ Pretties! It is a double brushed poly and is a dream to sew with! As a reminder, Stitchin’ Pretties ships within ONE BUSINESS DAY!!
Monica Pleated Size 5xl
Are you ready to shop now?

You can follow all of my sewing adventures through the links below!

  • You can follow my blog by clicking the Follow button on the right side of my blog.
  • You can follow me on Instagram by clicking here.
  • You can follow me on Facebook by clicking here.
  • You can follow me on YouTube by clicking here.
  • You can follow me on Pinterest by clicking here.
 As always this blog contains affiliate links which is a small commission I earn when you make a purchase from my blog.

5oo4 Monica 5x (1)

Mambo No. 5 Out of 4 Style

Unless you spent the year 1999 under a rock, you know Mambo #5! Lou Bega shared his love for all the ladies in the song and that is exactly what is happening on my blog this week! A little bit of Mambo love every single day!
So as an intro, I want you to know all of these skirts come loaded with options. All of them should be made with semi structured knit fabrics such as Liverpool, French Terry, or Ponte. I also have an insider tip… All these waistbands and pockets are interchangeable between the skirts! This is where I could make a joke about a Mambo threesome, foursome, or moresome, but Momma Mia reads my blog, so I won’t.

First off, I am showing you all the skirts at one time! These are the patterns I plan to share with you this week. Yes, All Of Them! As a bonus, I am sharing all the shirts also! 4 out of the 5 are brand new!

If that is all you need to see to know you NEED this pattern collection then here is the direction link to the pattern! FYI Momma Mia’s skirt is already a dress pattern on the 5oo4 site, but it rounds out the NO. 5! All of the options work with it!

The Entire Collection is at this link!

~~~~~~~~~~~~~~~~~~~~~~~~~~~~~~~~~~~~~~~~~~~~~~~~~~~~~~~~~~~~~~~~~~~~~~~~~~~~

A little bit of Erica is what I see

Tina is the half circle skirt in the collection! First I need to question why have I never worn a skirt like this before? Ummm hello! Dare I say this is pretty cute?! It totally hides my stomach and the suspenders are pretty fun!
I choose the wide waistband option with suspenders and height adjusted the skirt by 2 inches as I am only 5’1. This is the mini length and it is suppose to be at or near knee length. If you prefer a shorter mini, just adjust at the height adjustment line. I always say the best part about sewing, it making items to you exact likes and dislikes! Maybe short skirts and tall boots are about to be my thing!
5oo4 Erica 5x (4)
I want to tell you how easy this skirt was to sew up. I made it from printing to hemming in only a 2 1/2 ish hours. I love sewing with Ponte fabric! I picked up this print recently from Sew Blessed Fabrics. It has a nice weight to it which means my sewing machine doesn’t try to eat it when hemming. It serges neatly as well. My biggest issue was top stitching my suspender straps. For some reason, my tension was a little wonky and caused one to get very wavy. I pressed it the best I could then figured when worn it would pull flat anyhow. I am honestly not one of those perfectionist sewists. I go with the flow. If something looks bad, I will fix it. Otherwise, wear it and love it! If i didn’t tell you, you wouldn’t have known one of my straps was a little wavy. I tell you so that when you are sewing, you will check your tension and make sure yours is laying flat!
5oo4 Erica 5x (5)
This awesome red and black plaid is a ponte knit. It screams with 90’s grunge rocker vibes at me and originally I planned to make some pants. When this pattern test popped up, I knew I was about to channel my inner Avril Lavigne and wear a shortie plaid skirt with suspenders! Yep, I went there. I have no idea where I plan to wear this outfit, but even it it goes to the grocery store on a Sunday afternoon; it will be worn!
5oo4 Erica 5x (3)

The Women’s Erica Half Circle Skirt pattern includes the following:

  • Three Hem Lengths: Mini, Knee and Midi
  • Options include Suspenders, Patch Pockets or Side Seam Pockets
  • Three Waistbands: Tall, Slim, Lace Up Front
  • Tutorial includes a link to an extensive Skirt Fitting Guide to get your best fit!
  • Women’s Sizes XXS-5XL (see the last image for yardage and size chart)
Plus don’t forget Mix and Match with the other Mambo pattern options!
~~~~~~~~~~~~~~~~~~~~~~~~~~~~~~~~~~~~~~~~~~~~~~~~~~~~~~~~~~~~~~~~~~~~~~~~~~~~
Surprise, no solid black top in my closet other than a RTW tank that I pull out in a pinch. It isn’t a poor fit, but I now know how to get great fit! So what’s a girl to do??? If you said use your black double brushed poly from your stash, you would be correct. I found this on my Stitchin’ Pretties shelf, so I must have forgotten about it. I hacked a black top to wear with the new Tina! So in my mind, I had great visions of a Camilla, but worn backwards with that amazing cowl swooping down between my shoulders. That isn’t what you see here. Things didn’t go exactly as I planned, but this knot back top is pretty cool also. So let me explain how I got to it!
5oo4 Erica 5x (7)
I used the Easy Tee bodice front and did a Full Bust Adjustment. Next I cut the front bodice from a Camilla top to give myself all that extra fabric for my cowl neck swoop. I graded the armsyces to match the Easy Tee so I could use those sleeves. I assembled the front of my Easy Tee bodice like the back of the Camilla should be assembled. blah blah blah As it turns out this doesn’t work out like I had hoped, but I learned a few things along the way. I plan to revisit this idea so stay tuned. Anyhow, I still needed a pretty awesome black top so I put this top on my mannequin and played around. I ended up cutting straight down the middle of the cowl and serging those edges. Then tied a cut knot! 🙂 Easy Peasy, right?
5oo4 Erica 5x (6)
Anyhow I am loving my first skirt from the Mambo collection, please let me know what you think in the comments! You can pick up your own copy of all these patterns while they are on sale by using my afflink!
Here is the link to only the Tina skirt! On sale for the release party!
Here is the link to all the skirts! On sale for the release party!
Make sure you follow me on social media as this week will continue to be amazing!

5oo4 Erica 5x (1)

You can follow all of my sewing adventures through the links below!

  • You can follow my blog by clicking the Follow button on the right side of my blog.
  • You can follow me on Instagram by clicking here.
  • You can follow me on Facebook by clicking here.
  • You can follow me on YouTube by clicking here.
  • You can follow me on Pinterest by clicking here.

The Stevie Skirt- Rebecca Page

Do you need an outfit like super-fast? I know that I am not the only person who waits until the last minute when I need a special outfit to wear to an event. The Stevie is just about the easiest skirt EVER! Since this pattern is designed to be made with knit fabrics, there are no zippers or buttons to install which makes it a super fast and super easy project. It is sort of an instant gratification project honestly. Print, Tape, Cut, Sew, ENJOY! It will take you an hour or so.

IMG_3208

This flowy knit skirt can be worn for so many occasions. I made the longest length, which is the maxi. I shorted the length by several inches, I am only 5’1 so this is common in nearly every  bottoms pattern I sew. Measure your height and compare it to the pattern before cutting your fabric. Adjust for the length before cutting into your fabric stash. This skirt does come with 4 length options, so you can customize it for year-round use or one for every season.

IMG_3210

The Stevie is also perfect for a Momma and Me set because there is a newborn girls to 12 years pattern starting. If that isn’t enough, there is a 18 inch baby doll pattern too! This is the perfect pattern to take advantage of a bundle deal because everyone wears skirts!

IMG_3205


My Opinions: Comes together super quickly and is a basic no frills skirt. Instant Gratification! The size range is very inclusive from 18 inch doll to 5X women’s. This is a great starter skirt or perfect if you just need to get your “Sew-Jo” back. As is typical of Rebecca Page patterns, this one is well drafted with excellent directions.

IMG_3215

Recently this skirt was added into a Skirt Bundle and I am going to be showing you several of the skirts in the next week or so. I have gathered all of the links to all the Stevie patterns and bundle offers… Keep reading!!

Women’s skirt only $9.50

Stevie Skirt Bundle$18.00

  • Women’s
  • Kids
  • Doll

Women’s Skirt Bundle $29.50

and it includes all of these gorgeous patterns:

  • Hayley
  • Stevie
  • Arabella
  • Paige
  • Peggy


I have shared my Aff. Links in this post. That just means I make a bit of a commission all any patterns you purchase.

Are you following me on other social media? Here are my links.

  • You can follow my blog by clicking the Follow button on the right side of my blog.
  • You can follow me on Instagram by clicking here.
  • You can follow me on Facebook by clicking here.

Tutorial – How to Sew a Buttonhole

How to Sew a Buttonhole

If you have checked out my last blog post, you know that will you need to sew a few buttonholes to run your drawstring through on the Diane joggers. I am also currently in the planning phase of making a coat which has many buttonholes. 27 of them actually. I never really thought about the fact that maybe some people don’t know how to sew buttonholes until recently a friend said she had no idea. My machine sews automatic buttonholes with the push of a few buttons. If your machine doesn’t do this, it is ok. Just read your manual to see how you begin the process.

  1. I always do a practice hole. I do this for two reasons, to remind myself which way the buttonhole will be stitched and to make sure I am happy with the final product.


  1. Always use interfacing on the backside of the fabric where the buttonhole will be. Be sure to follow the manufacturer’s directions and the proper setting on your iron.


  1. Use your pattern to mark where the buttonhole placement is. I just poke a pin through my paper pattern at the start the buttonhole. I then use a marker to put a dot there. I use the marker mostly so I can see it.


  1. If you are making a buttonhole for an actual button, measure the size of your button. My machine has a buttonhole ruler at the base of the machine for convenience. I held mine in place with a piece of tape so that I could take a picture.

20190210_090927.jpg

  1. My machine has several options for buttonhole style. Select your buttonholes final look and size. I am able to enter these options in my computer settings, but your machine may be different from mine. I have a 12 MM button in this example. I also chose a basic buttonhole since I am only making holes for a drawstring.

20190210_090233.jpg


  1. Hold your fabric straight and begin your stitching. Let the machine do the entire buttonhole without moving your fabric. When finished clip your threads.


  1. To open your buttonholes, I place straight pins at the start and stop of the stitched buttonhole. Sometimes, I will place two at each end for extra security. I carefully use my seam ripper to poke between the two seam lines and then push it towards the pins at each of the ends. The pins will stop you from ripping through the buttonholes. Take the 5 seconds to do this, trust me. From experience, I know.

20190210_090654.jpg


  1. Ta-Da! You have now sewn a buttonhole! Some of my favorite garments I have made with buttonholes are listed below!

20190210_090831.jpg


Roxanne Top

5oo4 Roxanne 4x (6)

Anna Skirt

anna skirt diby (1)

Diane Joggers

5oo4 Diane Joggers and RP Paris Top (14)


In process: The Taylor Trench
Show me what project you have been avoiding because you don’t want to sew a buttonhole.


  • You can follow my blog by clicking the Follow button on the right side of my blog.
  • You can follow me on Instagram by clicking here.
  • You can follow me on Facebook by clicking here.

This blog post contains Affiliate Links. This means that when you make a purchase from one of my blog links, I receive a small commission. This doesn’t change the price for you, but is a little Thank You to me! It also helps me to buy more fabric to show you new and upcoming patterns. So thank you!!